Designer Blog: Documenting D39C
4/5 Deep Dives
By Arvin and Cruz
Deep Dives are a program that extends learning about certain topics students choose. One 4/5 deep dive section lasts 9 weeks. Some include Photography, Marine Biology, and Ceramics. Ms. Wineteer said that her favorite part of teaching the deep dive was ‘’teaching students things that I do not usually teach.’’ Ms. Wineteer said she also liked deep dive ‘’because the 4/5 grades get to explore their interests.’’ Ms. Wineteer’s Deep Dive, Changemakers cleaned up 2,225 pieces of trash for 1,193 kids in D39C. That shows that if everybody cleaned up just 2 pieces of trash daily, it would make a big difference. Deep Dives are a very interesting and productive way of learning. Our favorite part of deep dives is the Field Trips. I love deep dives.
Why People Like This School
By Kaden C., a designer at Design39CampusIn this article I will share what some people I know think about D39C and what they like about it. One of my friends said he likes this school because there are a lot of nice and empathetic people and you can become friends with everyone. We also do a lot of design challenges which require a lot of creativity and collaboration. Another friend said they like this school because you learn in different ways. And a friend said that they liked the school because it was creative and you get to do a lot of group work and it really is fun. One of my friends said he likes this school because the teachers always have things for us to do.
What is the Design Thinking Process?
By: Jacob A. and Toby V.
The Design process D39C is currently using has the following steps: Empathy, Research, Define, Ideate & Brainstorm, Model & Prototype, Test & Evaluate, Publish & Produce. With the design process, it helps the students design and collaborate with their other classmates. In the past, one example of using the design process was when students do Maker39. Maker39 was a fair for all kids at Design39Campus. The process and experience helped students learn to manage their money, supplies, and their carbon footprint. This also helped the students be more selective on what materials they are using.
Why is design thinking so important? Design thinking is a strategy for creative problem-solving. This will help the students be engaged in what they are learning at school. At Design39Campus, it can be used during a design challenge that all grades will be facing. The reason why design thinking is so important is because it helps students think about what went wrong and what worked so they can make corrections to their project. Another reason why design thinking is so important is because it helps think about other people instead of yourself.
We make connections between the Design Thinking Process and Science. This is one of the science experiments that we did and it is an electrocuted pickle. We also designed the great pumpkin drop that 4-5th graders do. Lastly, this is the design process with all the steps in order.


Your Student's PLTW
By: Nicholas E., Brit F., Tristan N., and David J.
Project Lead The Way, or PLTW for short, is an important class taken in every grade level at Design39Campus. In PLTW, students from all over the country learn about different subjects such as medicine, robotics, electricity, and more!
What is PLTW?
"PLTW is an American nonprofit organization whose vision is to expand students' STEM knowledge for use at elementary, middle, and high school grade levels" (pltw.org). Design39Campus has integrated PLTW into students' learning and designed a process where students learn curriculum based on their grade levels.
Offered PLTW Courses
Elementary students learn in PLTW Launch, a hands-on learning experience in which students learn how to apply their projects from PLTW in the real world. In middle school, there are three required PLTW courses, one for each year. The different PLTW courses that take place in middle school are Automation and Robotics, Design and Modeling, Green Architecture, Magic of Electrons, and Medical Detectives.
K-5 Launch
K-5 Launch is a PLTW class that is taken less often at the elementary level. In PLTW Launch, students learn about designing through real world problems. For most kids, this feels less like a task and more like fun play where they get the opportunity to experiment with designs! Most lessons in PLTW Launch are hands-on experiments that are based on the design process. This is a crucial exploratory subject for students.
6th Grade PLTW
In 6th grade, students take Automation and Robotics, which teaches them about the history of robotics and how to build and control mechanical systems. Mrs. Collins, a 6th grade teacher at Design39Campus, has been teaching PLTW for around 5 years. She is currently teaching Automation and Robotics and is teaching her students how to build a pull toy. These projects will eventually be given to the 1st grade students at our school. She teaches her students how to design, code, and automate gears to build a race car using a VEX kit. During the course, students will research and sketch what they are making, model and test it, make revisions if needed, and publish their results. Students can use their skills learned here and dive deeper into courses similar to it. They can even enter a field of work related to the subject.
Design and Modeling is another PLTW class for 6th graders. It’s a course where students get to express their ideas through their own sketches, solid models, and mathematical models. Students are also able to apply their ideas online on a professional-grade software called Autodesk Inventor which was used to design our school. Mr. Fitzpatrick, a 7th grade teacher who has been teaching PLTW for 14 years, claims that most students enjoy PLTW as they are learning with something they can apply in the real world. He also says that students struggle, but once they experience the “aha moment,” it makes all the struggles worth it!
Green Architecture is the final 6th grade PLTW option, also taught by Mr. Fitzpatrick. This course is not offered until Trimester 3. In Green Architecture, students learn different architectural styles, construction techniques/technologies, ways to be “green” when building, and using Autodesk Revit. Students not only learn how things are made or what they’re used for, but also what their impact is on the environment!
7th Grade PLTW
Magic of Electrons is a 7th grade PLTW course that teaches students about the history of electricity and how it works. Throughout this unit, students will go over the safety of tools before doing several hands-on activities to test what they learned. This course is being taught by 7th grade LED, Mrs. DiGiovanna and 8th grade LED, Mr. Jacobson. In an interview, Mr. Jacobson claims “students are not just learning about how electricity works, they learn what each component of electric circuits do.” He says that the goal of the course is to learn enough circuitry and soldering skills to eventually build a flashlight!
8th Grade PLTW
Medical Detectives is the 8th grade PLTW course. Taught by 7th grade LED, Ms. Ruppert and 8th grade LED, Mr. Asmus, this class students explore the human body and different medical fields. Students learn about the human body and eventually get to dissect a sheep brain. Currently, students are working on a career brochure where they explore and research a possible medical detective career they might be interested in. Throughout this course students will need to conduct research and create hypotheses to be successful.
Overall, PLTW is a subject enjoyed by students where they learn new things normally never taught in school! These courses allow students to learn about fields of work and possible interests to pursue in high school and beyond. Students learn knowledge and experience within this class which is something that will help them now and in the future.

The Glowforge in a Nutshell
By: Anjali N., Dihain, P, and Hansith P.
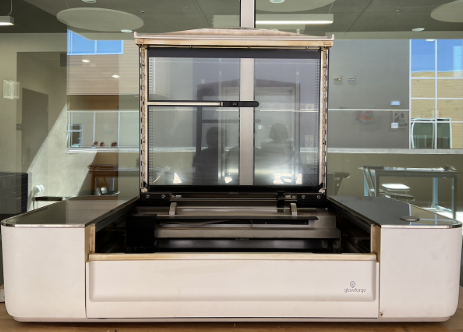
“The students are excited and very motivated about using the Glowforge.” said Stacey Lamb (4th and 5th grade LED and one of the teachers who facilitates use of the Glowforge). The Glowforge is a 3D laser cutter and engraver. The Glowforge is one of the main tools that 4th and 5th grade students use on campus. It really helps us students try new things. Ms. Lamb said that you can laser print on many different mediums, like wood or acrylic. According to glowforge.com, you can also laser print on glass, coated metal, marble, anodized aluminum, wood, fabric, leather, titanium, phones, tablets, laptops, and even chocolate! The Glowforge can also really help the kids grow and learn how to use new tools. All of the students who are using the Glowforge, whether it’s for business or for class projects, enjoy using it.The kids in 4th or 5th grade use the Glowforge for Deep Dive, Exploration, business, and just for fun! Kids really benefit and enjoy the process of using Glowforge. In this article, we will go over how the Glowforge works, and its pros and cons.
Student making a black and white design for the Glowforge program.
The Glowforge is a 3D laser cutter and engraver. The way it works is that you use Glowforge’s software to make a design. Here are the steps for making a design on the glowforge. For example, let's say you wanted to use the Glowforge for a logo. The first thing you would do is make a black and white design (as shown in the photo below). The next step you would do is to clean the logo up a little bit. For instance, taking out unnecessary parts that won’t be needed. The next step is to submit it to the app and then print it. Depending on the design it may take from a few minutes to a couple of days. But in the end, kids are very satisfied with their results.
The Glowforge has its pros and cons. First, let’s start with the pros. One of the good things about the Glowforge is that it really motivates a lot of kids. The way the Glowforge works just fascinates all of the kids working with it and therefore promotes interest in the Business Deep Dive. “It’s a way to produce art in a 3D way,” Ms. Lamb (4/5 LED) says, “a lot of the kids are using it for many creative projects.” But now, there are some cons. For example, although the Glowforge is a very awesome tool, it also costs a lot to buy the expensive resources. The final con is that no matter what you do, you HAVE to use Glowforge's software program.
The Glowforge is an amazing tool. It helps kids and makes them excited to try new things. Kids get so excited to print things out on the Glowforge. The Glowforge can also become an amazing resource for different things. For example, last year, we began to do Business again after the COVID-19 shutdowns and we saw many, many people use Glowforge for their products: bookmarks, wooden journals, logos, bracelets, board games, and much more. Kids here at D39C used the Glowforge for plenty of things!


Education is important. But beyond academics, people need jobs, often, students are uneducated on life skills required to thrive after school. Design39Campus gives students an upper hand by allowing them to learn about what it takes to become financially savvy in life. In 5th grade, students have the opportunity to take a field trip to Junior Achievement Biztown.
What is Biztown?
Biztown is a place designed for 5th graders to go and learn about business. To prepare for the field trip, the 5th graders at Design39 learn about finance and business. Then, about a few weeks before the field trip, students will apply for “jobs,” using the skills they learned over the past few months. At Biztown, students work for 5-6 hours in a simulation where they work as citizens of Biztown.
Being a citizen is the most important part of Biztown. In order to create an immersive, comprehensive simulation, students must work with every resource they have, acting as a citizen. Students can also interview to become Mayor, where they will be in charge of the inner workings of Biztown.
How Students Prepare for Biztown
To prepare for Biztown, LEDs teach students about the four significant parts of finance: financial literacy, community and economy, work readiness, and business management. These four aspects are important to understand, in order to be successful in one’s Biztown experience, and even later in life! LEDs also teach students how to create a job application or resume, write checks, and use credit cards.
Why These Skills are Important
This field trip to Biztown is important because of how it teaches students the importance of getting a job and being a good citizen. These skills learned along the way give these students an upper hand when applying for jobs.
Teachers have been taking students to Biztown ever since this school opened. This proves the importance of the field trip, as this program has stood the test of time.
Trips to Biztown usually occur as early as Fall and as late as mid-Spring. This year, 5th graders will go to Biztown in late October. This year's students are very excited to go!
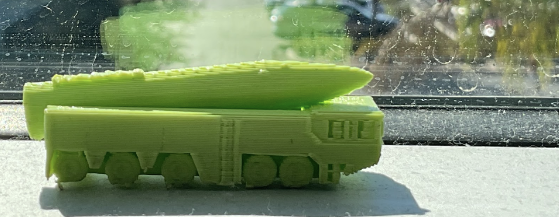
Since the 1980s, 2D has become 3D. Chuck Hull made an advanced tool that we can now find all around our school known as the 3D printer. There are 3D printers that can be found throughout the school are the MakerBot Replicator and 2 Anycubic 3D printers. The MakerBot Replicator is a 3D printer with a built-in LCD screen, a USB port, and sometimes an on board camera, which is a camera installed on the 3D printer. The Anycubic 13 Mega is a 3D printer that makes extremely high quality prints with smaller designs. In our school, students have the opportunity to give life to the designs they make.
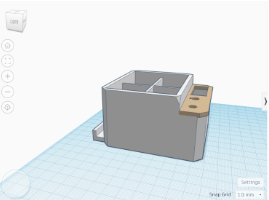
Students in the 6/7/8 3D Printing workshop go to a 3D modeling app, primarily Tinkercad. Tinkercad is a program that lets you make 3D designs for your 3D printer. There, they model their design and upload the Stl. file (which is a file format commonly used for 3D printing) to be printed by the Workshop teacher, Mr. Hamlin. First, they could drag any shape that is in the sidebar. They then could make the shape bigger, smaller, and taller. There are hole shapes which are shapes that make normal shapes hollow. When you merge them with the normal shape, it makes a hole the shape of the hole shape. You can also get shapes and combine them together to make a unique shape. You can keep combining shapes even after you combine 2 shapes together. Once you are done with your design, you press the button that lets you upload the file into your files. Once you upload the files to the assignment, Mr. Hamlin would get the file and upload it to the 3D printer, where it gets printed.
“My favorite part of the 3D printer is the efficiency, and the rate at which it expels plastic. The spool spinning around can symbolize materials being used and you can see designs getting built at that moment.” Clayton, a 6th grade student who is taking this elective. Currently, the printers have been used for the 3D printing workshop where kids have designed a name plate, a trophy, a game piece, and even a dice!
How Students Make Designs Elementary Section: Here we have an interview with Ethan, Aiden, and Alia, 4th graders who used the elementary school Makerbot for Maker39. We asked what their favorite part of the 3D printer was. “My favorite part is the filament,” the two agreed. “We used the 3D printer a lot in 3rd grade for Maker39,” Ethan replied when asked about how much he used the 3D printer. “You make a design on Makerbot, you download it into a file, then upload it onto a USB. Put the USB into the 3D printer, insert the filament then twist the type knob and find your design,” Alia responds after being asked about the process of using the 3D printer. “We made Apple Watch fidgets spinners. I would design it, put into a USB, put in the 3D printer and wait. We made 26 in total. It took us 2 weeks,“ Aiden responds after being asked about his process of using the 3D printer for his Maker39 business.
Overall, the school's 3D printers have provided education, fun and promoted creativity.